Planting Potato Sets: A Farmer’s Guide for a Strong Start
Mar 24, 2025
As spring settles in across Tennessee, it’s time to start planting potatoes. Whether you’re growing for the market or your own table, potatoes are a rewarding crop that thrives in our region’s cool spring weather. With a little preparation and the right approach, you’ll be well on your way to a bountiful harvest.
Most Co-op locations carry high-quality potato sets, including favorite varieties like Kennebec, Yukon Gold, and Red Pontiac, so stop by and get yours while supplies last.
Soil Preparation
Potatoes prefer well-drained, loose soil with a slightly acidic pH between 5.8 and 6.5. If your soil tends to be heavy or compacted, work in generous amounts of compost or other organic matter to improve its structure. Well-prepared soil not only supports healthy root development but also helps prevent issues like rot and disease.
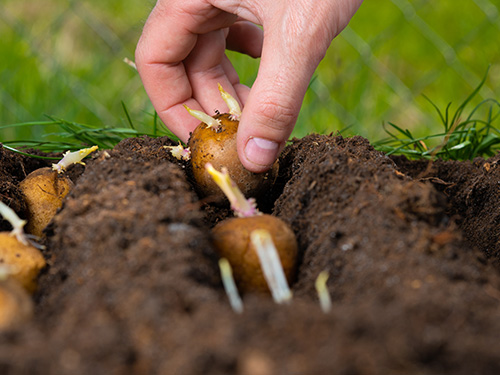
Planting
Once your soil is workable and has warmed to around 50 degrees Fahrenheit, it’s time to plant your potato sets. Follow these guidelines for optimal growth:
Care and Maintenance
As your potato plants grow, hilling is crucial for protecting tubers from sunlight and encouraging more growth. When plants reach about 8 inches tall, mound soil around the lower half of the stems. Repeat this process every 2 to 3 weeks throughout the growing season, or use straw mulch for an easier harvest.
Watering and Feeding
To maximize your potato harvest, ensure plants receive consistent moisture, about 1 to 2 inches per week, especially during flowering and tuber formation. Avoid waterlogging, as this can cause rot. For feeding, use a continuous-release fertilizer formulated for edibles to provide steady nutrients. Side-dress with nitrogen-rich fertilizer when plants reach 6 inches tall to encourage leafy growth.
Managing Temperature and Pests
Potatoes prefer soil temperatures between 60 and 70 degrees Fahrenheit for optimal tuber formation. If temperatures rise above 80 degrees, tuber growth slows. Using a 6-inch layer of straw mulch can help keep the soil cooler.
Common pests include Colorado potato beetles, flea beetles, and aphids. To keep them in check, rotate crops annually, use row covers for protection, and apply organic or approved insecticides if infestations occur.
Harvesting and Storage
You can begin harvesting new potatoes about 2 to 3 weeks after flowering by gently loosening the soil and lifting tubers from the ground. For storage potatoes, wait until the plants die back before harvesting. After digging, cure potatoes in a cool, humid environment for two weeks to toughen the skin, then store them in a dark, cool location with high humidity to prevent sprouting.
Co-op has everything you need for a successful potato crop, from quality seed potatoes to fertilizers and pest control solutions. Stop by your local Co-op today and let us help you get growing.
Find the nearest Co-op location here. For more seasonal farm tips, check out the latest issue of The Cooperator.
Most Co-op locations carry high-quality potato sets, including favorite varieties like Kennebec, Yukon Gold, and Red Pontiac, so stop by and get yours while supplies last.
Soil Preparation
Potatoes prefer well-drained, loose soil with a slightly acidic pH between 5.8 and 6.5. If your soil tends to be heavy or compacted, work in generous amounts of compost or other organic matter to improve its structure. Well-prepared soil not only supports healthy root development but also helps prevent issues like rot and disease.
Planting
Once your soil is workable and has warmed to around 50 degrees Fahrenheit, it’s time to plant your potato sets. Follow these guidelines for optimal growth:
- Space plants 12 to 14 inches apart in rows
- Keep rows 3 feet apart for airflow and ease of hilling
- Plant 4 to 6 inches deep with the eyes facing upward
- If space is limited, grow potatoes in large containers with nutrient-rich potting mix
Care and Maintenance
As your potato plants grow, hilling is crucial for protecting tubers from sunlight and encouraging more growth. When plants reach about 8 inches tall, mound soil around the lower half of the stems. Repeat this process every 2 to 3 weeks throughout the growing season, or use straw mulch for an easier harvest.
Watering and Feeding
To maximize your potato harvest, ensure plants receive consistent moisture, about 1 to 2 inches per week, especially during flowering and tuber formation. Avoid waterlogging, as this can cause rot. For feeding, use a continuous-release fertilizer formulated for edibles to provide steady nutrients. Side-dress with nitrogen-rich fertilizer when plants reach 6 inches tall to encourage leafy growth.
Managing Temperature and Pests
Potatoes prefer soil temperatures between 60 and 70 degrees Fahrenheit for optimal tuber formation. If temperatures rise above 80 degrees, tuber growth slows. Using a 6-inch layer of straw mulch can help keep the soil cooler.
Common pests include Colorado potato beetles, flea beetles, and aphids. To keep them in check, rotate crops annually, use row covers for protection, and apply organic or approved insecticides if infestations occur.
Harvesting and Storage
You can begin harvesting new potatoes about 2 to 3 weeks after flowering by gently loosening the soil and lifting tubers from the ground. For storage potatoes, wait until the plants die back before harvesting. After digging, cure potatoes in a cool, humid environment for two weeks to toughen the skin, then store them in a dark, cool location with high humidity to prevent sprouting.
Co-op has everything you need for a successful potato crop, from quality seed potatoes to fertilizers and pest control solutions. Stop by your local Co-op today and let us help you get growing.
Find the nearest Co-op location here. For more seasonal farm tips, check out the latest issue of The Cooperator.