Savory Success
Nov 20, 2023
As Thanksgiving approaches, it may be time to elevate your cooking game and add a twist to your traditional turkey preparation. Smoking a turkey imparts a rich, flavorful taste that will have your guests coming back for seconds and thirds.
Keep reading for a helpful guide on smoking the perfect turkey for Thanksgiving.
Choosing the right bird
To start on the right foot, select a high-quality turkey. Look for a fresh, organic bird if possible, as the flavor profile is often superior. Ensure the turkey is properly thawed if frozen, allowing at least 24 hours in the refrigerator for every five pounds. This ensures even cooking and a juicy result.
Prepping the turkey
Before you even think about firing up the smoker, it’s crucial to properly prepare the turkey. Rinse it under cold water and pat it dry with paper towels to achieve that coveted crispy skin. Also, consider brining your turkey to infuse it with flavor and moisture. A simple brine of water, salt, sugar, and aromatic spices like bay leaves, thyme, and peppercorn works wonders. Allow the turkey to soak in the brine for 12-24 hours in the refrigerator.
Seasoning for flavor
After brining, let the turkey air-dry in the refrigerator for a few hours. This helps the skin crisp up during the smoking process. Before smoking, apply a flavorful rub to the turkey. A combination of herbs, spices, and a touch of olive oil will enhance the taste and appearance of your bird.
Selecting the wood
Choosing the right wood is crucial for achieving that perfect smoky flavor. Hardwoods like hickory, apple, or cherry are excellent choices. Soak the wood chips or chunks for at least 30 minutes before adding them to the smoker to ensure a slow, steady release of smoke.
Setting up the smoker
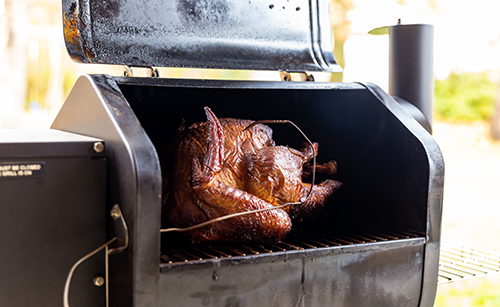
Whether you’re using an electric, charcoal, or wood pellet smoker, it’s important to preheat it to a stable temperature of around 225-250° F. Maintain this temperature throughout the cooking process for optimal results. The cooking time will depend on the size of your turkey and the smoker’s temperature, but generally, you can plan for about 30 minutes of smoking time per pound. Aim for an internal temperature of 165° F in the thickest part of the turkey.
Basting and monitoring
To keep your turkey moist, consider basting it with a flavorful liquid like a mixture of broth, butter, and herbs every hour. Additionally, monitor the smoker’s temperature regularly and adjust the vents and/or add more fuel as needed to maintain steady heat.
Resting and serving
Once your turkey reaches the desired internal temperature, remove it from the smoker and let it rest for at least 20-30 minutes before carving. This allows the juices to be redistributed, ensuring a succulent and flavorful experience.
With the right preparation, a flavorful brine and rub, and a little bit of patience, you’ll create a Thanksgiving meal that your friends and family will remember for years to come. Your local Co-op offers a selection of outdoor cooking supplies to make your smoked turkey a success, so plan to visit us before the holidays. Find the nearest location here.
For more content like this, check out the latest issue of The Cooperator.
Keep reading for a helpful guide on smoking the perfect turkey for Thanksgiving.
Choosing the right bird
To start on the right foot, select a high-quality turkey. Look for a fresh, organic bird if possible, as the flavor profile is often superior. Ensure the turkey is properly thawed if frozen, allowing at least 24 hours in the refrigerator for every five pounds. This ensures even cooking and a juicy result.
Prepping the turkey
Before you even think about firing up the smoker, it’s crucial to properly prepare the turkey. Rinse it under cold water and pat it dry with paper towels to achieve that coveted crispy skin. Also, consider brining your turkey to infuse it with flavor and moisture. A simple brine of water, salt, sugar, and aromatic spices like bay leaves, thyme, and peppercorn works wonders. Allow the turkey to soak in the brine for 12-24 hours in the refrigerator.
Seasoning for flavor
After brining, let the turkey air-dry in the refrigerator for a few hours. This helps the skin crisp up during the smoking process. Before smoking, apply a flavorful rub to the turkey. A combination of herbs, spices, and a touch of olive oil will enhance the taste and appearance of your bird.
Selecting the wood
Choosing the right wood is crucial for achieving that perfect smoky flavor. Hardwoods like hickory, apple, or cherry are excellent choices. Soak the wood chips or chunks for at least 30 minutes before adding them to the smoker to ensure a slow, steady release of smoke.
Setting up the smoker
Whether you’re using an electric, charcoal, or wood pellet smoker, it’s important to preheat it to a stable temperature of around 225-250° F. Maintain this temperature throughout the cooking process for optimal results. The cooking time will depend on the size of your turkey and the smoker’s temperature, but generally, you can plan for about 30 minutes of smoking time per pound. Aim for an internal temperature of 165° F in the thickest part of the turkey.
Basting and monitoring
To keep your turkey moist, consider basting it with a flavorful liquid like a mixture of broth, butter, and herbs every hour. Additionally, monitor the smoker’s temperature regularly and adjust the vents and/or add more fuel as needed to maintain steady heat.
Resting and serving
Once your turkey reaches the desired internal temperature, remove it from the smoker and let it rest for at least 20-30 minutes before carving. This allows the juices to be redistributed, ensuring a succulent and flavorful experience.
With the right preparation, a flavorful brine and rub, and a little bit of patience, you’ll create a Thanksgiving meal that your friends and family will remember for years to come. Your local Co-op offers a selection of outdoor cooking supplies to make your smoked turkey a success, so plan to visit us before the holidays. Find the nearest location here.
For more content like this, check out the latest issue of The Cooperator.